
1-800-351-8234
The PT50A reports the maximum force in grams needed to sever a standardized test medium—the lower the number, the sharper the edge. That number is your BESS score. Use it to compare edges, track your sharpening workflow, and validate results over time.
Bear in mind that you’re measuring penetration sharpness, not everything about an edge (geometry, bite, finish). Treat BESS as your process control metric, ideal for testing your sharpening methods side-by-side.

Setup on a flat, stable surface. Power on and let the unit auto-calibrate. The PT50A self-calibrates on each startup, so avoid bumping the table while it boots.
Use the same test media. Note the media type/lot in your log so results are comparable later. We've provided a log template below.
Pro moves: Set up in good light at seated height. Rest your forearms on the bench to reduce shake. Small technique changes can improve your test accuracy.
If you’re using the aluminum test media fixture, reload as shown in the manual’s five-step sequence. The goal is no slack but no over-tensioning. Just remove droop across the gap. Over-tensioning isn’t helpful and can skew results.

Quick check: After tightening the lower thumb screw, the media should be straight across in the groove without bowing down.
The PT50A supports two media formats:
Aluminum Test Media Fixture (ATF): Produces standard BESS readings.
Disposable Test Clips: In their unaltered state, clips produce readings about 20% lower than ATF. To standardize clip results to BESS equivalence, multiply the clip reading by 1.2, or de-tension the clip by working one leg of the clip forward and back.

When to choose which:
Use clips for occasional checks or for making a measurement quickly. Use the aluminum fixture for tighter control and long-term comparability.
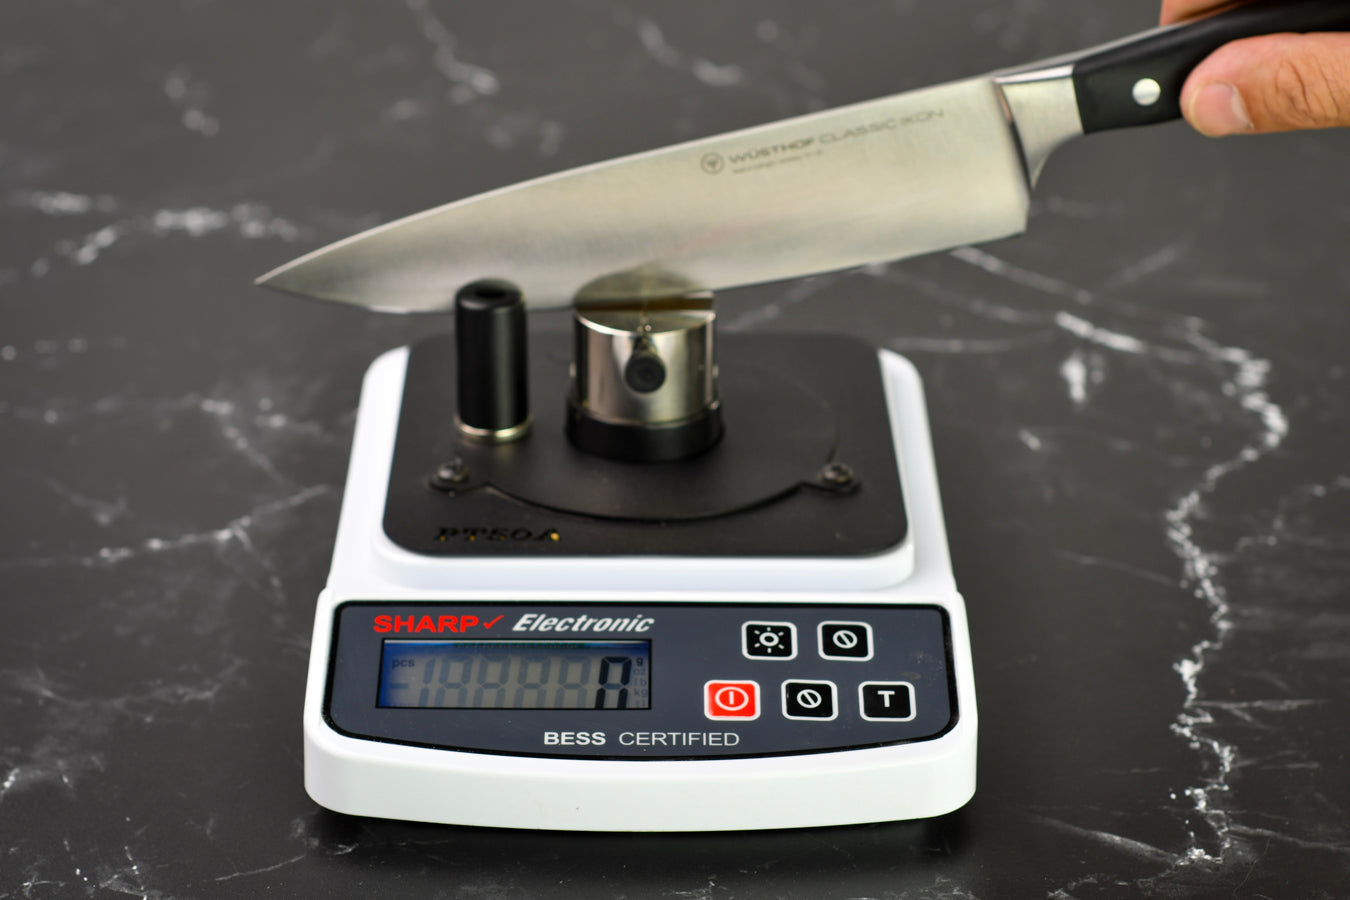
Align the slots. Center the wide slot in the fixture with the narrow slot in the knife fulcrum.
Keep the blade vertical. The fulcrum acts as a hinge. Avoid spine tilt toward/away from you.
Slow and deliberate. Press down smoothly until the media parts; don’t chop or saw.

Thick blades? If a blade won’t fully seat, that’s okay, keep the edge in the slot and the blade vertical. For consistently thick blades, Edge-On-Up notes that you can widen the fulcrum slot carefully.
For very dull edges (around >500 BESS) or odd geometries, use the Aluminum Test Fixture and consider wearing cut-resistant gloves.
The PT50A is the recommended model when edges may frequently exceed ~1000 BESS or for light industrial/commercial use.
Test in the same places (heel/middle/tip) and note locations; big spread = non-uniform sharpening or burr.
Compare like-to-like: same media, same position, same speed of testing movement.
Typical BESS ranges can be roughly interpreted as:
~130–200: very sharp
~200–400: sharp working edge
>500–1000+: dull, maintenance or repair needed
These are guidelines, not absolutes; use them to set targets.
Numbers feel “too good”? If you used clips, remember to add 20% (×1.2) or de-tension per the manual to match ATF readings.
Sudden spikes: Re-align the slots, verify blade verticality, and ensure you are lowering at a consistent speed. Power cycle to re-calibrate if needed.
High variance run-to-run: Load fresh media, slow your press, and verify there’s no over-tension on the fixture.
Flat, stable bench → power on → auto-calibrates.
Media loaded: straight, no slack, not over-tensioned.
Slots aligned, blade vertical, slow & steady press.
Using clips? Convert by ×1.2 to match BESS scores.
| Date | Knife/Tool | Location (heel/mid/tip) | Media type/lot | BESS #1 | BESS #2 | BESS #3 | Avg | Notes (steel, progression, deburr) |
|---|---|---|---|---|---|---|---|---|
| 2025-08-11 | Chef’s 210mm | Mid | ATF / Lot 0425 | 235 | 218 | 226 | 226 | 400/1k/3k + light stro strop |
Use this same table for chisels, shears, etc. The more you log, the clearer your fastest route to target BESS becomes.
Treat the PT50A as your QA dashboard: same media, same technique, same positions.
Slow, vertical, aligned: that’s the technique formula.
Know your media mode (fixture vs. clips) and convert clip readings when needed.
Use trends and averages to make sharpening decisions with confidence.