
Step-by-Step Knife Sharpening
A Step-by-Step Guide for Sharpening Knives Using Sharpening Stones
This step-by-step guide will walk you through how to sharpen your knives using sharpening stones. We recommend you read our article Selecting a Sharpening Stone to help you determine the best stone for your application.
One more thing to consider before you proceed is if you would like to sharpen your knife freehand or use a guide such as the DMT Sharpening Guide. Your skill and experience in sharpening will help you decide on the method that's best for you. If you are experienced and comfortable with freehand sharpening, a knife guide may be unnecessary. On the other hand, a knife sharpening guide is an inexpensive and easy way to keep the angle consistent. If you have tried to sharpen before but never achieved the proper edge, we recommend using the sharpening guide. The guide can solve common mistakes in the sharpening process. If you choose to use a guide, please read our how-to for using the knife sharpening guide.

Step 1: Select the proper coarseness for your sharpening stone.
Selecting the proper coarseness for your sharpening stone is an important first step in sharpening your knife. Not every knife needs to start at the coarsest stone you have, on the other hand a very dull knife can not be sharpened on only your finest stone. Starting with the proper coarseness will ensure that you achieve the edge you need quickly. If your knife is very dull or has a nicked blade, start with your coarsest stone. The coarse stone removes material quickly so a poor edge can be refined quickly. However, the coarse stone must be followed up with your finer stone to refine the edge. If your knife is only slightly dull and just needs a quick touch up, starting at a medium or fine stone can save you time. Starting on a fine stone requires fewer steps but must only be used on an edge requiring little work.

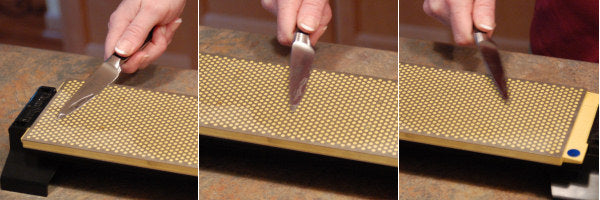
Step 2: Select the right angle.
Selecting the right sharpening angle is the next step in sharpening. For more detailed instructions on selecting the right angle, try reading this article. Regardless of the method of sharpening, a appropriate angle should be selected. This angle doesn't need to be exact but following some general guidelines is a good idea. Most knife manufacturers recommend a roughly 20 degree angle. Depending on the use of your knife, you can move up or down from that angle. A fillet or slicing knife is never used on anything hard so an angle a few degrees less will produce a sharper edge. On the other hand, a survival knife with various uses can benefit from a more durable edge a few degrees larger.

Step 3: Apply water or oil to stone.
Some stones need water, while other stones need oil for floating the swarf (small metal filings created when sharpening) away. Simply apply a few drops of either oil or water directly to the stone. (We recommend using an inexpensive spray bottle for applying the water.) The lubricant you need is determined by the type of stone you are using. Water stones and diamond stones require water. Oil stones such as India, Crystolon and Arkansas stones use oil for a lubricant.
Step 4: Sharpening the knife.
Starting with the coarsest stone needed for your knife, you will progress through each finer stone until you have reached the desired level of sharpness.
Rest your knife on the stone at your chosen angle. An easy method for determining the angle by eye is to visualize a 45 degree angle and then take half that amount. That will give you a ballpark estimate of the angle and then you can adjust accordingly up or down. With a slicing action bring the length of the knife across the stone with a motion that starts with the heel of the knife on the stone and ends with the point of the knife. The motion should resemble a sweeping arc pattern across your stone. Be very careful to maintain the angle of the knife on the stone. Longer curved knives provide additional challenges but as long as you can maintain the angle you will be sharpening very effectively. Repeat this process on the other side of the knife and continue repeating until you have sharpened your knife though all your stone grits.
An alternative method for a very dull knife.
A dull knife requires a coarse stone and may require more time using the stone. Because it can require many strokes, we suggest that you take up to 10 strokes before alternating sides.
How do you know if you are done with a stone?

An important but often confusing area of sharpening is knowing when you're done with one stone and ready for the next finer grit. On coarse stones it is very easy. When you sharpen one side you will notice a burr forming on the opposite side of the edge. This burr is hard to see but is easy to feel. Very carefully feel for the burr by gently running your hand from the spine to the edge. (Do not run your finger along the knife edge from heel to tip, that's only asking for trouble!) A burr is formed when your stone removes material directly at the edge. The burr will move from one side of your knife to another as you alternate sharpening sides. Make sure you have felt the burr jump between both sides before you move on to the next finer stone. That will ensure that you have sharpened both sides effectively. The finer grits are done the same way but the burr is much smaller. On the finest grits you may not be able to notice the burr at all. Testing the knife sharpness will tell you when you're done. (Learn how you can test to see if your knife is sharp.)
How sharp does it need to be?
In most cases, the sharper, the better. The sharpness of your edge is determined by the angle (the lower the angle, the sharper the edge) and how fine of a grit you choose for your final honing. Since you have already determined your angle many steps earlier, now you just need to know which grit you can stop at. This again depends on the use of the knife. In most cases, go all the way to the finest stone that you own as this will give you your best edge. The only exception would be a knife used to cut soft vegetables like tomatoes, as a slightly more coarse edge will provide more of a tooth pattern for easier cutting.